
Edit lightly and put it all together
A few adjustments in the right order make a good photo better; too many make it look fake. Learn a simple editing order, the classic over-edits to avoid, and a one-minute checklist for taking any photo from scene to share.
A sensible editing order
- Crop and straighten
Level the horizon and tighten the composition, using the thirds.
- Exposure or brightness
Get the overall brightness right first.
- Contrast, highlights and shadows
Set contrast, then pull highlights down and lift shadows a little to recover detail at both ends.
- White balance
Temperature and tint, so whites look white or the mood is the one you felt.
- Saturation or vibrance, a little
Vibrance boosts muted colours more than strong ones and is gentler on skin.
- Sharpening and noise reduction, lightly, last
A small amount, checked at full size.
Check yourself
Nima opens a beach photo in his phone's editor. What should he usually do first?
- Boost saturation
- Sharpen
- Crop and straighten
- Add a filter
Show the answer
Crop and straighten
Right. Fix the frame first: a level horizon and a tighter composition. Every later adjustment then works on the picture you're actually keeping.
Check yourself
Mina's photo of her friend has the focus on the wall behind him instead of his face. A good edit can make his face properly sharp again.
Show the answer
False
False. Editing can't put back detail that was never recorded. Missed focus, heavy shake and fully blown-out highlights stay broken; sharpening only adds bright outlines. Those have to be got right in the camera.
Step through it
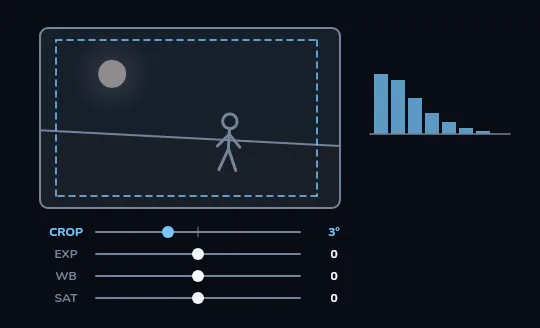
Step 1: straighten the 3° tilt and crop The photo of a figure under a dull sun is tilted by 3 degrees and looks dark, and its histogram piles up on the left. The CROP slider is active, with a dashed, level crop rectangle drawn over the picture. First straighten the 3 degree tilt and crop so the subject sits on a third.
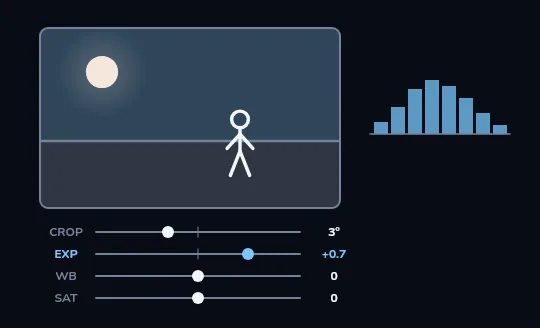
Step 2: exposure +0.7 The photo is now level and cropped, with the figure on the right third. The EXP slider moves to +0.7: the picture brightens and the histogram spreads towards the middle. Lift exposure until the histogram spreads out without touching the right edge.
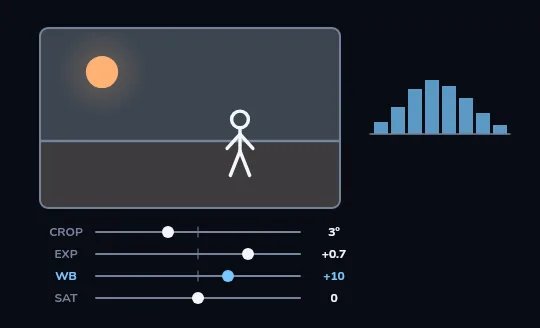
Step 3: warm the white balance, WB +10 The WB slider moves towards warm, to +10. The whole picture takes on a warm tint and the sun turns orange. Warm the white balance a touch to bring back the evening light.
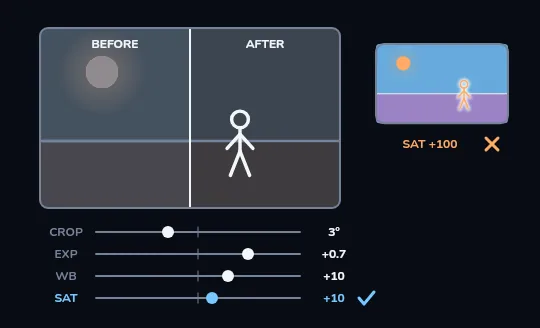
Step 4: compare, and stop before it looks fake The main photo is split down the middle into BEFORE and AFTER. Beside it, a SAT +100 version with neon colours and a glowing halo around the figure is crossed out, while the SAT slider below is ticked at +10. Stop well before it looks fake: compare with the original, and pull back the strongest slider.
Check yourself
After Reza's edit, the sky is neon blue and his friend's skin looks orange, like the crossed-out inset. What did he overdo?
- Cropping
- Saturation (or vibrance and warmth)
- Straightening
- Noise reduction
Show the answer
Saturation (or vibrance and warmth)
Right. Neon skies and orange skin are the signature of too much saturation, often with too much warmth on top. Pull it back until the colours look like the day did.
Classic over-edits
- Oversaturated orange skin and neon skies.
- Heavy clarity or HDR: halos around edges and a crunchy look.
- Shadows lifted until they're grey and noisy.
- Too much sharpening: bright outlines around everything; heavy smoothing on skin.
- When it looks right, pull the strongest slider back a little, and press and hold the image to compare with the original. Check on a screen at normal brightness.
RAW or JPEG/HEIC?
RAW
Keeps much more of what the sensor recorded, so there's more room to recover highlights and shadows and to change white balance later. Bigger files, and it needs editing before sharing.
JPEG or HEIC
Processed by the camera or phone, smaller, and ready to share straight away. Less room to rescue a mistake, but perfectly fine for most everyday photos.
Check yourself
Sara is going through yesterday's photos. Which problems can a light edit fix, and which had to be right in the camera?
- A horizon tilted by a few degrees
- A picture that's a little too dark
- Colours a bit too cool
- Focus on the wall instead of the face
- Heavy blur from shaking hands
- A sky blown to pure white
Show the answer
Fixable in the edit: A horizon tilted by a few degrees, A picture that's a little too dark, Colours a bit too cool
Get it right in camera: Focus on the wall instead of the face, Heavy blur from shaking hands, A sky blown to pure white
The one-minute checklist: Mina on a park bench at 18:30
- 1. Light
Where is it coming from? The low summer sun is behind her left shoulder: turn her so it falls from the side-front, or use it as a rim.
- 2. Subject and background
One clear subject, a simple background a few metres behind, nothing growing out of her head.
- 3. Composition
Grid on, eyes near the upper third, room in the direction she's looking, horizon level.
- 4. Focus
On her nearest eye: tap it, or let eye AF find it.
- 5. Exposure
Check her face and the histogram, and nudge −EV or +EV as needed.
- 6. Shoot several
A burst, plus a couple of variations in angle or distance.
- 7. Edit lightly and share
Crop and straighten, exposure, contrast, white balance, a touch of colour, then stop.
Check yourself
Nima wants to use the checklist. Which order is right for these four steps?
- Focus on the eye → find the light → check exposure → compose with the grid
- Find the light → compose with the grid → focus on the eye → check exposure
- Compose with the grid → check exposure → find the light → focus on the eye
- Check exposure → focus on the eye → compose with the grid → find the light
Show the answer
Find the light → compose with the grid → focus on the eye → check exposure
Right. Light first, because it decides where you stand and which way the person faces. Then compose, focus on the eye, and check exposure last, since it depends on everything before it.
Lesson recap
- Your phone's built-in editor is enough, and most editors keep the original so you can revert.
- Edit in order: crop and straighten, exposure, contrast with highlights and shadows, white balance, a little colour, light sharpening last.
- Cropping throws away pixels: half the width and height keeps a quarter.
- Avoid neon colours, halos, grey shadows and crunchy sharpening; compare with the original and pull the strongest slider back.
- Editing can't fix missed focus, heavy shake or blown highlights. Light, compose, focus, expose, shoot several, then edit lightly.